Sunday, August 5, 2012

Paper Butterflies

It is probably no surprise to regular readers of this blog that I would have a collection of patty/muffin/cupcake cases.


I just can't resist those pretty decorated papers. The thing is, I don't make cupcakes or muffins that often. I'm more of a slab of cake kind of a girl.  I do use smaller cases for chocolates and truffles at Christmas and yet, I keep buying more cupcake cases.  Perhaps I think I am going to be asked to cater afternoon tea for 500 and need to be ready, or when sea levels make it to my house, I'll be able to find the kitchen.  Whatever the reason, I have too many cupcakes cases and need to make some room.  The solution - butterflies!


To make the butterflies, I drew a large and a small butterfly shape on a piece of cardboard, and cut them out to make templates.


I chose a selection of cupcake cases in complementary colours and flattened them out with my hand.  I put the templates on the back of the cases and drew around them in pencil.


I cut the butterfly shapes out.


Using craft glue, I glued the smaller shapes down the centre of the larger shapes.  Instant butterflies.


The butterflies can be glued onto gift bags.


Or pinned specimen-style onto a cork pin-up board for decoration.


This post was inspired by some origami paper butterflies I made a few years ago to decorate Christmas presents.  Origami paper works well as it is coloured on both sides.  You can also make butterflies out of wrapping paper or coloured tracing paper.  Different thicknesses of paper do produce different results.  The cupcake case butterfly is quite delicate and flimsy, and would look good on presents wrapped in tissue or crepe-like papers.

Sunday, July 22, 2012

Jubilee Bakewell Tarts

I'm still continuing with my own personal Jubilee celebrations by making another English classic - the Bakewell Tart.


The Bakewell Tart originated in Bakewell (funny that) and, like many classics, was the result of a mistake.  It started out life as a pudding on a puff pastry base served warm, and over time has become a tart served cold for afternoon tea.  The modern day version is essentially sweet pastry, jam, and frangipane topped with flaked almonds, or iced and decorated with a glace cherry.


Most recipes I've seen are for one large tart, but I've decided to go with individual portions.  I could have gone mini-muffin size, but it is the peak of winter and too many carbohydrates are just not enough at this time of year, so it is regular muffin tin size for me.

Individual Bakewell Tarts recipe (makes 12)

Pastry

250g plain flour
100g unsalted butter
100g pure icing sugar
2 eggs
pinch of salt

Filling

2 heaped tbsp raspberry jam
125g unsalted butter, softened
125g caster sugar
125g ground almonds
2 eggs
1 egg yolk
25g plain flour
zest of 1 lemon


Decoration

Flaked almonds or icing

To ice six tarts, you will need:

125g soft icing sugar
2 tbsp lemon juice
3 glace cherries cut in half

Lightly process the butter, sugar, flour and salt in a food processor and add the eggs.  Pulse until the mixture comes together.  Tip onto a floured surface and work lightly to bring the dough together to form a disc.  Wrap the dough in cling film and refrigerate for at least an hour.

Remove the dough from the fridge and roll out on a floured surface to about 2mm thickness.  Cut 12 circles from the dough (I used the top of my metal measuring cup) and line the muffin tin.  Refrigerate the tin for at least an hour.


Blind bake the pastry at 180 degrees celsius for 10 minutes, then remove the pastry weights and bake for another 7 minutes until the pastry is cooked through and golden.  Cool the pastry cases, and reduce the oven temperature to 170 degrees celsius.

To make the filling, beat the butter until light and fluffy.  Add the lemon zest and mix through.  Process the ground almonds and caster sugar in a food processor until combined.  Do not over process, otherwise the almonds will heat up and release their oils resulting in a more dense mixture.  Add the combined sugar and almonds to the butter and beat until light.  In a separate bowl, gently beat the eggs and egg yolk with a fork and add to the mixture in small batches, incorporating well after each addition.  Add the flour and mix until combined.


Put the raspberry jam in a small bowl and mix with a fork until loose and runny as this makes it easier to work with.  Place a teaspoon of jam at the bottom of each pastry case. 


Place a dessertspoon of the frangipane over the top, and decorate with flaked almonds (or not, if you are going to ice).  


Bake at 170 degrees celsius for 30 minutes or until a skewer comes out clean.


I decorated six tarts with flaked almonds, and iced the others with lemon icing after the tarts had cooled.  


These tarts have texture and flavour, which is everything you need in a tart. I'm putting them on high rotation.

Sunday, July 15, 2012

Decorating Gift Bags with Washi Tape

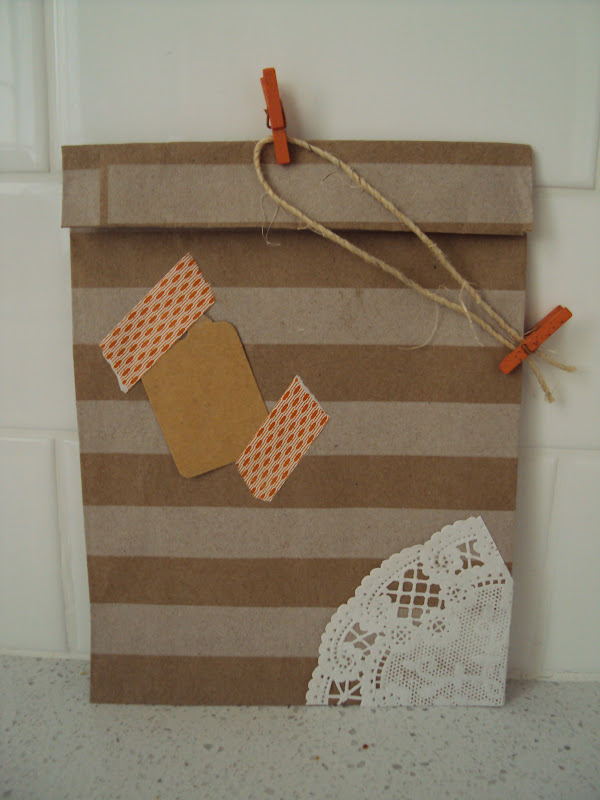
I've recently discovered the joys of washi tape. I bought a few rolls on a whim at a craft fair a couple of months ago thinking I would use them to seal gift bags.  I had seen other bloggers use washi tape as decoration on cards, wrapping paper and gift bags, but never thought it was my cup of tea.  Too random and unstructured, I thought.  Well, let me tell you, I have never felt so free!


Inspiration came during the week in the form of some decorated wrapping.  I had purchased a few bits and pieces on etsy, and some of the purchases arrived wrapped in brown paper and decorated in washi tape.  It was a complete revelation that the random placement of torn washi tape could create such an effortless look.  It is this breeziness that appeals to me, the less is more quality that seems thrown together at the last minute but isn't. While there are no rules, you still need to make some strategic decisions about placement and colour to achieve a balanced look.  

With that in mind, here are the results of my first foray into the world of washi tape.


I started small......


....added some lace flourishes....


... grew in confidence....


and then went completely too far....


Less is definitely more, but it was fun going there.

These little rice paper rolls of colour add the 'sweetness and functionality' to a gift bag that the manufacturer (mt masking tape) is looking for.  I'll definitely be using it again.

Sunday, July 1, 2012

Gift Wrapping - Cascade of Hearts

T'is the birthday season so I have been wrapping up a storm in recent weeks. I bought a retro biscuit barrel for one of my friends which threw up a few wrapping challenges.  A large, cylindrical shaped gift is a difficult shape to wrap as the large surface area makes the wrapping paper look very flat and uninspiring.  I decided to add some structure and texture to give the wrapping a lift.  I started with a blank canvas of brown paper, added some sinamay and twine around the centre, and topped it off with some heart-shaped ornaments.


The main feature is the ornaments.  You'll need some coloured card (preferably coloured on both sides), craft glue, twine and scissors. Draw half a heart shape and cut it out.  Mine is about 5.5cm.   Use this as your template.


Fold the card in half and cut out six half-heart shapes on the fold so you get six complete hearts.


Take one heart, and glue half of another heart to half of the first heart.


Repeat until you have glued five half hearts on top of one another.  For the sixth heart, glue one side of a whole heart and stick it to half of the fifth heart and half of the first heart.  This creates the ornament shape.  Press all sides together firmly, and trim any uneven bits.

Take some twine and thread it through the centre of the ornament, and tie a knot and the bottom.


I made five ornaments using different lengths of twine.  I knotted all the twine together and stuck the knot to the top of the present.  


The end result is a cascade of hearts in 3D.


Sunday, June 24, 2012

Queen of Puddings

I know it has been a while, but I've been to Sydney and had another lurgy to contend with.  I don't usually get sick, but the flu season has been particularly bad in Perth this year. Fingers-crossed I won't get it again.

My trip to Sydney coincided with the Queen's Diamond Jubilee celebrations in London.  As I was out and about, all I saw were highlights on the news.  If I had been at home, I would have been glued to the television.  I do love a Royal occasion, and have a long history of being glued.  It all started with the wedding of Diana and Charles.  I was at a very impressionable age when that took place, and have been hooked ever since.  The English do pomp and ceremony so well.  Oh, and merchandise too.


As part of my Jubilee celebrations on this blog, I'm starting with the Queen of Puddings.  This pudding is essentially cake soaked in egg custard, covered with raspberry jam and topped with meringue.  Traditionally it is made using bread crumbs or sponge cake, but Australians tend to make it with Madeira cake for extra calories.  This end result is a very sweet pudding, which is just the thing for lurgy season.


I'm not sure of the history of the pudding.  Mrs Beeton's Book of Household Management, which I turn to on such occasions, contains a very large number of pudding recipes but the Queen of Puddings is not mentioned.  There is a Royal Coburg pudding and an Empress pudding, but these bear no resemblance to the Queen of Puddings.  Quite a few of the recipes involve breadcrumbs, and sometimes jam, but they also include dried fruit, suet and/or puff pastry.  The flavours of the Queen of Puddings seem very Victorian to me.  Mrs Beeton's book was first published in 1861 so perhaps some bright spark adapted a breadcrumb pudding and created the Queen of Puddings later in Queen Victoria's reign, perhaps even for her Diamond Jubilee in 1897.

Queen of Puddings recipe

1 x 450g store bought Madeira cake
250g full cream milk
250g whipping cream
1 tsp vanilla bean paste
3 eggs
235g caster sugar
250g jar of raspberry jam

Heat the milk, cream and vanilla bean paste in a saucepan until just about to boil.  Remove the saucepan from the heat and set aside.  Separate the eggs, and whisk the egg yolks and 60g of the sugar until light.  Pour the warm milk/cream into the eggs and whisk gently until combined.  If you whisk too vigorously, the mixture will froth up and can stay that way resulting in a bubbly custard.  Pour the mixture back into the saucepan and stir continuously over a gentle heat until the custard coats the back of the spoon.  This takes about 5 minutes. 

Cut the Madeira cake into 1cm slices and line the base of a large baking dish.  Fill any spaces with offcuts.  Pour the custard over the Madeira cake in small quantities and leave for about 30 minutes until the custard is absorbed.


As Madeira cake has a very dense consistency, it doesn't always soak up all the custard, so spoon off any excess.  While you're waiting for the custard to be absorbed, pre-heat the oven to 180 degrees celsius.

Put the raspberry jam into a bowl and stir until smooth, as this makes it easier to spread.  Spread the jam evenly over the surface of the cake. 


Whisk the egg whites into soft peaks and add the remaining caster sugar in small batches until the sugar is dissolved and the egg whites are thick and glossy.  Spread the meringue over the jam, making swirls as you go.  Bake in the oven for 20 minutes or until the meringue has a golden hue.  Serve immediately and enjoy the sweet, gooey goodness.


Sunday, May 20, 2012

Apple Tart

I had a virus a few weeks ago which resulted in me spending five days in bed.  In the good moments, I was able to catch up on some reading.  For years, my Dad has been encouraging me to read "Scoop" by Evelyn Waugh.  It is a satire, and revolves around the adventures of William Boot, a nature columnist, who is mistakenly sent to a fictional African state as a war correspondent in the 1930s.  It wasn't quite my cup of tea as some of the descriptions went on for ages, but there were some very funny passages, including a couple involving a goat, which I've copied below.  For context, the goat was tethered at Frau Dressler's pensione where Boot was staying. 

"The milch-goat was allowed a narrower radius; those who kept strictly to to the causeway were safe, but she never reconciled herself to this limitation and, day in, day out, essayed a series of meteoric onslaughts on the passers-by, ending, at the end of her rope, with a jerk which would have been death to an animal of any other species.  One day the rope would break; she knew it, and so did Frau Dressler's guests."

And then later...

"The milch-goat looked up from her supper of waste paper; her perennial optimism quickened within her, and swelled to a great and mature confidence; all day she had shared the exhilaration of the season, her pelt had glowed under the newborn sun; deep in her heart she too had made holiday, had cast off the doubts of winter and exulted among the crimson flowers; all day she had dreamed gloriously; now in the limpid evening she gathered her strength, stood for a moment rigid, quivering from horn to tail; then charged, splendidly, irresistibly, triumphantly, the rope snapped and the welter-weight champion of the Adventist University of Alabama sprawled on his face amid the kitchen garbage."

The reason why I found this so funny was not because of the cocktail of over the counter flu medication I had taken, but because it reminded me of an interaction I had with a goat in Ravensthorpe.  My Dad was working down there, and we had gone to spend some time with him during the school holidays.  After settling into the motel, I spied an untethered goat in a neighbouring field and immediately wanted to befriend it.  For some reason, my Mother had fortuitously packed a loaf of bread, and I skipped gleefully over to my soon to be new best friend with a few slices.  I got through the fence and held out the bread, and the goat knocked it out of my hand.  I bent over to pick it up and the goat head-butted me in the bottom.  We weren't friends after that.

Speaking of my childhood, here is another favourite from my Mother's repertoire - Tarte aux Pommes - from The Margaret Fulton Cookbook.  It was always a Saturday night post-roast winter staple. 


Apple Tart (adapted from The Margaret Fulton Cookbook)

For the pastry

250g plain flour
100g unsalted butter (softened)
100g icing sugar
pinch of salt
2 eggs

For the filling

7 medium Granny Smith apples
1 tbsp water
1/2 cup caster sugar
1/4 cup brandy
30g unsalted butter
1 tbsp lemon juice
1 tbsp raw caster sugar

For the glaze

2 tbsp apricot jam
1 tbsp water

Method

For the pastry, put the flour, icing sugar and salt into a food processor and pulse lightly until the mixture resembles breadcrumbs.  Add the eggs, and pulse until the mixture is just combined.  Do not overmix, otherwise the pastry will become leathery.  Turn out onto a floured surface.


Shape the pastry into a disc and refrigerate for 30 minutes.  When firm, roll out and line a 22cm tart tin.  As pastry shrinks, I always leave a little bit extra around the edges and the cut off any excess after it has come out of the oven. 


Put the tin in the freezer for 10 minutes to firm up.  Preheat the oven to 180 degrees celsius, and blind bake the pastry for 15 minutes. 


Remove the pastry weights and then bake for another 5 minutes until the pastry is a light golden colour. 

In the meantime, make the filling.  Peel and core five of the apples, and cut them into chunks.  Put the apples in a large saucepan with the brandy, water, 15g of the butter, and caster sugar.


Cover, and simmer on a gentle heat for about 20 minutes, stirring occasionally.  Remove from heat, and puree in a food processor.  Spread the puree into the tart shell. 


Peel and core the remaining two apples, and slice them thinly. Toss them with the raw caster sugar and lemon juice, and then lay them in a circular pattern over the puree. 


Melt the remaining butter and brush over the apple slices.  Bake the tart at 190 degrees celsius until the apples are golden brown (about 40 minutes).  I sometimes increase the heat to 200 degrees in the last 10 minutes to encourage caramelisation. 

To make the glaze, heat the jam and water in a saucepan and bring to a simmer.  When smooth and clear, spread over the warm tart.


This tart is a winner, although as a child it always used to give me a headache.  Mum said it was because of the brandy.  The alcohol cooks out, so it is just flavouring rather than a potential child protection issue.  Perhaps it was just too much for my sensitive goat-loving constitution.  It certainly doesn't give me a headache now.

Sunday, May 13, 2012

Mothers Day - Fabric Covered Bag

I always make something for my Mum on Mothers' Day.  In the early years, Mum graciously received paper flowers, seedpod jewellery, objets de macaroni, and cards with lots of glitter, silver stars and some crazy texta work.  I also occasionally made Mum breakfast in bed.  When I was seven, I remember making her an egg and toast combination from a children's cookbook I had borrowed from the library.  It involved buttering two slices of bread, cutting a hole in the middle of one slice using a biscuit cutter, putting this on top of the other slice, cracking an egg into the hole and then baking it in a hot oven.  There may have been a tomato or tomato paste involved, but that part is a bit of a blur.  However, I vividly recall getting up early and making this dish on my own, which was a big deal as it involved putting the gas oven on all by myself.   The dish worked out a treat, but it was back in the day when Pure and Simple baking spray was popular and I had sprayed that oven tray within an inch of its life.  I proudly took it into Mum, who was her usual gracious self, but did mention a certain Pure and Simple flavour permeating the bread.  I learnt an important lesson that day. 

So, for today, Mothers Day 2012, I made this cherry crumble cheesecake of awesomeness from Dan Lepard's book "Short and Sweet - The Best of Home Baking". 


In the gift wrapping department, I continued with my use of fabric, this time covering a large gift bag with a 1930's inspired floral print.


I started by measuring the front, base and sides of the bag, and cut the fabric to size.


I removed the existing handles and, using craft glue, stuck the fabric onto the bag, beginning with the base.


I then made some holes where the handles used to be, and threaded through some matching ribbon, tying a knot at each end.


Just the right kind of gift bag for a dressing gown.

Sunday, May 6, 2012

Wrapping with Fabric

I'm becoming increasingly interested in using fabric to wrap gifts.  Fabric is recyclable, doesn't require sticky tape, and there are lots of designs to choose from.  People in Japan have been using fabric to wrap gifts for years.  Furoshiki is a traditional square-shaped cloth used to wrap objects of different shapes and sizes, and tied in interesting ways.  I'm not at the furoshiki stage quite yet, but I thought I would see what I could do with some denim/cotton fabric I had lying around.


I started by making a pompom.  I cut a strip of fabric, about 6.5cm wide.


 I then cut some denim tagliatelle of about 1cm in width.


I traced some circles onto cardboard and cut them out.


I put the circles together, then wound the fabric once between the inner and outer circles and tied a knot.


I continued to wind the fabric between the inner and outer circles, joining strips together as I went, until I couldn't get any more fabric through the inner hole. 


I then cut around the circle in between the cardboard and tied a knot in the middle.


I wrapped the gift in a piece of the same fabric in the usual way, fixing the ends with a strip of fabric tied in the centre.  I then tied the pom-pom onto the strip of fabric to complete the look.


The stiffness of the fabric creates a nice pompom and the frayed edges give it a bit of interest.

Using fabric to wrap gifts is win-win.  The recipient can recycle the wrapping, and you reduce your fabric stash giving you room to buy more.