Sunday, October 21, 2012

Gift wrapping with flowers

I have pastry hands, not origami hands, and this is partly because I have difficulty following instructions for origami.  I seem to get to the half way point in any paper folding activity when things start to go awry.  I have the same issue with instructions for any kind of electrical equipment.  It is all gobbledygook to me.  Fortunately, I have a brother who understands these things and provides tech support for my entire family.  Unfortunately, I don't know an origami master who I can call on. I really like origami and have a beautiful book on how to make origami flowers.  I haven't managed to complete one yet and am starting to develop origami related fear.  However, I have managed to stop this becoming any worse by discovering how to make a really simple flower of a non-origami nature.


Start by choosing a selection of double-sided scrapbooking paper in complementary colours.  You can make the leaves using the same paper, but if green leaves are more your thing, you'll need a sheet of green paper too. You'll also need some floral wire stems and craft glue.


Cut a square of paper, about 13 x 13 cm.


Either draw a spiral in pencil on the paper or, trust yourself, and start cutting.  It doesn't have to be even.  Nature isn't.

Roll the paper up until you reach the centre and then let the paper unravel in your hand.  It should now resemble a ranunculus.


Glue a floral stem onto the back of the flower.


Cut out a leaf shape and glue it over the top of the stem.  I used a lilly pilly leaf as a template.


Make a whole bunch.....


....and place it on a present for your Mum.


Monday, October 1, 2012

Banoffee Pie

Today is the Queen's Birthday holiday in Western Australia, and it seems fitting that I mark the occasion with the final post in my baking series to celebrate the Queen's Diamond Jubilee, aka the Jubilation series.  I'm finishing with the great English classic from the 1970s - Banoffee Pie.


The first time I ever heard of Banoffee Pie was in the movie "Love Actually" when Juliet, the character played by Keira Knightley, knocks on Mark, the art gallery owner's, front door, and asks "Banoffee pie?"  You see a tantalisingly short glimpse of a slice of pie in a white box, but the pie isn't mentioned or seen again.  Over the years, I've often thought of that Banoffee Pie and wondered what it is.  And today is the day I found out.  
The pie was created in 1972 by the chef at The Hungry Monk restaurant in East Sussex.  The word  "banoffee" is a combination of the words banana, toffee and coffee to reflect the original ingredients of banana, soft caramel toffee (made from boiling cans of sweetened condensed milk), and coffee flavoured whipped cream.

I've gone semi-traditional with this recipe. Rather than boiling cans of sweetened condensed milk for 3 hours, I've made the dulce de leche, another first for me, using the oven method.  In the process, I've discovered that dulce de leche would make the perfect break-up food. It's gooey, sweet and comforting, but should only be eaten in small quantities otherwise you'll end up feeling a bit sick and a bit sad.


I also haven't flavoured the whipped cream.  The coffee on top of all that sweetness would have made my head, actually anyone's head, explode. Instead, I've decorated the top of the pie with a Flake.

Banoffee Pie

Pastry

250g plain flour
100g unsalted butter, softened
100g pure icing sugar, sifted
2 eggs
pinch salt

Dulce de Leche

2 x 395g cans of sweetened condensed milk

Filling

1 quantity of dulce de leche
2 medium bananas
juice of 1 lemon
600ml thickened cream
1 Cadbury Flake bar

Method

Make the dulce de leche first. Preheat the oven to 225 degrees celsius   Pour the sweetened condensed milk into an ovenproof dish and cover tightly with foil.  Put the dish into a roasting pan and fill with hot water until half way up the dish.


Place in the oven for an hour and a half, checking the water level every 40 or so minutes and topping up, if required.  (I used one can at a time as my baking dish wasn't big enough so the cooking time may change if you use both cans at once).  The dulce de leche is ready when it has an overall caramel appearance. Take the dish out of the water and whip the dulce de leche until smooth.  Cool and then store in an airtight container in the fridge until ready to use.

Make the pastry by putting the flour, icing sugar, salt and butter into a food processor and pulsing lightly until the mixture resembles breadcrumbs. Add the eggs one at a time and pulse until combined.  The dough will come away from the sides and form a ball.  When it does this, stop, and tip the contents onto a floured surface.  Form the dough into a disc shape and refrigerate for an hour.  Take the dough out of the fridge and roll out flat.  Gently lift it into a tart tin, and refrigerate for at least an hour.  When ready, blind bake the pastry shell at 180 degrees celsius for 20 minutes.  Remove the pastry weights, and bake for another 15 minutes or until golden brown.


When the pastry shell has cooled, you can start putting the pie together. First, spread the dulce de leche into the tart tin.


Cut the bananas into thin slices and toss them in the lemon juice.   Top the dulce de leche with the bananas.


Whip the cream to soft peaks and spread over the bananas.  Crumble a Flake over the top.


This is such a Seventies dessert, and someone in the UK probably ate it in 1977 to celebrate the Queen's Silver Jubilee.  You can just see batwing sleeves with every mouthful.


Sunday, September 23, 2012

Cinnamon Sugar


One of my favourite night-time snacks as a child was cinnamon toast.  My Mum used to make this for my brother and I when we got home from seeing a concert.  Mum loved classical music and used to take us to hear the Perth Symphony Orchestra at the Concert Hall.  My Dad worked away a lot so it was always just the three of us heading out in Mum’s Ford Consul into the city for a night out.  

I wasn’t so interested in the music, but I really liked the dressing up part, usually a long dress or ankle length velvet skirt and my little fur handbag (it was the 70s), and feeling very grown up.  I also enjoyed the spectacle of it all, particularly at Proms concerts as you got to throw streamers at the end, and the people watching part, but the music was kind of lost on me.  I think the only time I really got into the music was when Mum took us to see a West Indian steel drum band and I got up onto the stage and danced, much to the embarrassment of my brother.  Give me something with a beat any day. 

Anyway, these soirees always ended with cinnamon toast.  The three of us would stand around the kitchen eating cinnamon toast and discussing the evening’s events.  To this day, whenever I taste or even smell cinnamon sugar, I am immediately transported back to those evenings.


A nice use of cinnamon sugar is on top of a traditional tea cake.  There are loads of tea cake recipes around so I won’t repeat one here.  


All you need to do is brush the top of a tea cake with melted butter, mix equal quantities of cinnamon and sugar together and then sprinkle over the top.  Instant childhood memory. 


Sunday, September 9, 2012

Sponge Queen in Exile

I am not Australia's next Sponge Queen.  The Australian Women's Weekly ran a competition earlier this year to find Australia's Sponge Queen, which I entered.  The State semi-finalists were announced last month, and I'm not one of them.  And that's quite OK.  But I am disappointed I won't get to cook in the Women's Weekly test kitchen in Sydney, where the final is being held. The chance to cook in that kitchen was the main reason I entered.  It is the holy grail for bakers, where recipes are tested and cookbooks developed.

My generation grew up on Women's Weekly magazine style recipe books after they first appeared in the early 1980s. They are part of our history, reflecting the tastes and preferences of Australians, and our after-school and weekend rituals of helping Mum in the kitchen. They are the books we turned to after moving out of home, and when we needed a recipe we know would work.  Everyone has at least one Women's Weekly recipe book in their kitchen, and everyone knows about the AWW test kitchen. For as long as I can remember, I have always wanted to go there and bake cakes.


I entered the Sponge Queen competition with a cornflour sandwich sponge recipe.  It is a recipe I use all the time as it is so light and airy, and consistently good. In fact, it featured in my very first post on this blog (for the Shortcut Dobos Torte).  Nonetheless, I tested and re-tested that recipe about 30 times before entering the competition, and made a few modifications.

Cornflour Sandwich Sponge recipe

4 eggs
1/2 cup caster sugar
1 cup cornflour
pinch salt
1 tsp cream of tartar
1/2 tsp bicarbonate of soda, sifted
2 drops vanilla essence
1 tbsp copha, melted
plain flour, for dusting

Preheat the oven to 180 degrees celsius.  Brush the inside of each tin with the copha and dust with flour.  Whisk the eggs, sugar and vanilla essence together on a high speed for at least 10 minutes until thick and fluffy.  Add the cornflour, cream of tartar, bicarbonate of soda and salt. Gently fold the dry ingredients into the egg mixture.  Divide the mixture evenly between the two sandwich tins.  Bake in the oven for 15 minutes. The sponges are cooked when they have come away from the sides of the tins, and spring back to the touch.

Tips

1.  The eggs should at be at room temperature for maximum aeration.  The eggs not only bind the ingredients together, but are the key raising agent. Aerated eggs = towering sponge of goodness.

2.  Whisk the eggs and caster sugar to the 'ribbon stage', which means that when you take the whisk out, a thick ribbon of mixture will fall back into the bowl.  Reaching the ribbon stage takes about 10 minutes on my Kitchenaid mixer.  The volume of the mixture trebles in size, and is pale and thick.  So thick, in fact, that if you put the dry ingredients on top of the mixture, they will stay there.


3.  When whisking to reach the ribbon stage, whisk for about 5 minutes on high speed, and then reduce the speed to medium for another 5 minutes.  This ensures that the air bubbles in the mixture are uniform, giving the mixture stability.  Large bubbles can burst during the cooking process, which results in a flatter sponge, and nobody wants to see that. Large air bubbles also rise to the top affecting the look of the surface of the sponge.

4. To sift or not to sift the dry ingredients?  I found that sifting the dry ingredients (except for the bicarbonate of soda, which does need to be sifted as it is lumpy) makes absolutely no difference to the end result. Controversial I know, but the key to a good sponge at this stage of the process is how you fold in the ingredients not whether you have sifted the ingredients.  A heavy folding hand removes the aeration and sifting the ingredients beforehand won't save you.  Be kind and gentle to your mixture and fold the dry ingredients in with a light touch.  I use a spatula so I can really get down to the bottom of the bowl and turn the ingredients over.  I find that using a large metal spoon doesn't get into all the nooks and crannies and you sometimes find pockets of dry ingredients when pouring the mixture into the tins.

5.  Speaking of tins, I use anodised aluminium tins with deep sides and a non-stick surface.  Notwithstanding they are non-stick, you still need to grease the inside of the tins and dust them with flour.  I found after careful testing of cohpa, sunflower oil, unsalted butter and lard, that melted copha is the best.  It will give your sponge smooth sides and a smooth bottom every time.  EVERY time.

So there are my tips from my test kitchen in suburban Perth.  Not quite the AWW test kitchen, but I'll get there some day.  A girl can dream.


Sunday, September 2, 2012

Paper Butterflies #2

I've gone a little butterfly crazy since my last post.  I invested in a large butterfly paper punch, and have been adding butterflies to everything I possibly can.


Before going any further though, I have a confession to make.  I once killed a cabbage moth for the sake of art.  I was trying to add a touch of realism to a Mothers Day card I was making.  My vision was a nature scene and, in my seven year old head, I thought the moth would lift the card to another level. My Mum was very gracious about it but, honestly, what was I thinking?  For the record, dead insects have never featured in my card-making activities again, and my relationship with the insect kingdom is extremely positive. For example, a large spider has been living on the outside of my kitchen window for almost a year and I have never once thought of reaching for the Baygon. And this is coming from someone who screamed the entire way through the movie "Arachnophobia".

Anyhoo, back to the beautiful world of butterflies.  Here are a couple of really simple ideas.

Take a coloured paper gift bag, preferably duck egg blue.  Stick a small paper doily in the middle of the bag using double sided tape.  Punch out a butterfly in black card, glue it down the centre and place it in the middle of the doily.


The doily and the butterfly create a simple silhouette, and add a touch of old-fashioned elegance to the bag.

Another idea is the double whammy butterfly on a small gift box.  Using the template I created for the previous post, I cut out a large butterfly from light brown card.  For the smaller butterfly, I punched it from the paper I used to wrap the gift box.


The butterfly adds height and texture to an otherwise plain box.

Enough butterflies for a while....but they will be back!

Sunday, August 5, 2012

Paper Butterflies

It is probably no surprise to regular readers of this blog that I would have a collection of patty/muffin/cupcake cases.


I just can't resist those pretty decorated papers. The thing is, I don't make cupcakes or muffins that often. I'm more of a slab of cake kind of a girl.  I do use smaller cases for chocolates and truffles at Christmas and yet, I keep buying more cupcake cases.  Perhaps I think I am going to be asked to cater afternoon tea for 500 and need to be ready, or when sea levels make it to my house, I'll be able to find the kitchen.  Whatever the reason, I have too many cupcakes cases and need to make some room.  The solution - butterflies!


To make the butterflies, I drew a large and a small butterfly shape on a piece of cardboard, and cut them out to make templates.


I chose a selection of cupcake cases in complementary colours and flattened them out with my hand.  I put the templates on the back of the cases and drew around them in pencil.


I cut the butterfly shapes out.


Using craft glue, I glued the smaller shapes down the centre of the larger shapes.  Instant butterflies.


The butterflies can be glued onto gift bags.


Or pinned specimen-style onto a cork pin-up board for decoration.


This post was inspired by some origami paper butterflies I made a few years ago to decorate Christmas presents.  Origami paper works well as it is coloured on both sides.  You can also make butterflies out of wrapping paper or coloured tracing paper.  Different thicknesses of paper do produce different results.  The cupcake case butterfly is quite delicate and flimsy, and would look good on presents wrapped in tissue or crepe-like papers.

Sunday, July 22, 2012

Jubilee Bakewell Tarts

I'm still continuing with my own personal Jubilee celebrations by making another English classic - the Bakewell Tart.


The Bakewell Tart originated in Bakewell (funny that) and, like many classics, was the result of a mistake.  It started out life as a pudding on a puff pastry base served warm, and over time has become a tart served cold for afternoon tea.  The modern day version is essentially sweet pastry, jam, and frangipane topped with flaked almonds, or iced and decorated with a glace cherry.


Most recipes I've seen are for one large tart, but I've decided to go with individual portions.  I could have gone mini-muffin size, but it is the peak of winter and too many carbohydrates are just not enough at this time of year, so it is regular muffin tin size for me.

Individual Bakewell Tarts recipe (makes 12)

Pastry

250g plain flour
100g unsalted butter
100g pure icing sugar
2 eggs
pinch of salt

Filling

2 heaped tbsp raspberry jam
125g unsalted butter, softened
125g caster sugar
125g ground almonds
2 eggs
1 egg yolk
25g plain flour
zest of 1 lemon


Decoration

Flaked almonds or icing

To ice six tarts, you will need:

125g soft icing sugar
2 tbsp lemon juice
3 glace cherries cut in half

Lightly process the butter, sugar, flour and salt in a food processor and add the eggs.  Pulse until the mixture comes together.  Tip onto a floured surface and work lightly to bring the dough together to form a disc.  Wrap the dough in cling film and refrigerate for at least an hour.

Remove the dough from the fridge and roll out on a floured surface to about 2mm thickness.  Cut 12 circles from the dough (I used the top of my metal measuring cup) and line the muffin tin.  Refrigerate the tin for at least an hour.


Blind bake the pastry at 180 degrees celsius for 10 minutes, then remove the pastry weights and bake for another 7 minutes until the pastry is cooked through and golden.  Cool the pastry cases, and reduce the oven temperature to 170 degrees celsius.

To make the filling, beat the butter until light and fluffy.  Add the lemon zest and mix through.  Process the ground almonds and caster sugar in a food processor until combined.  Do not over process, otherwise the almonds will heat up and release their oils resulting in a more dense mixture.  Add the combined sugar and almonds to the butter and beat until light.  In a separate bowl, gently beat the eggs and egg yolk with a fork and add to the mixture in small batches, incorporating well after each addition.  Add the flour and mix until combined.


Put the raspberry jam in a small bowl and mix with a fork until loose and runny as this makes it easier to work with.  Place a teaspoon of jam at the bottom of each pastry case. 


Place a dessertspoon of the frangipane over the top, and decorate with flaked almonds (or not, if you are going to ice).  


Bake at 170 degrees celsius for 30 minutes or until a skewer comes out clean.


I decorated six tarts with flaked almonds, and iced the others with lemon icing after the tarts had cooled.  


These tarts have texture and flavour, which is everything you need in a tart. I'm putting them on high rotation.

Sunday, July 15, 2012

Decorating Gift Bags with Washi Tape

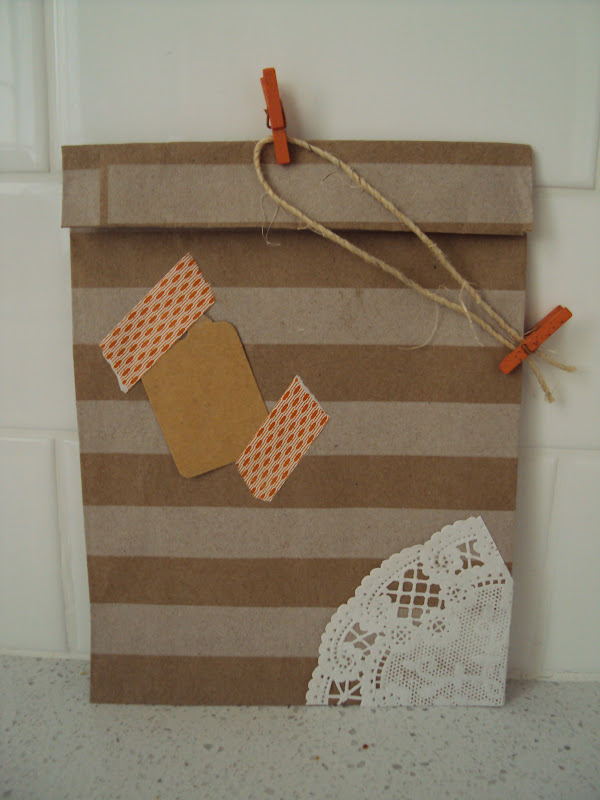
I've recently discovered the joys of washi tape. I bought a few rolls on a whim at a craft fair a couple of months ago thinking I would use them to seal gift bags.  I had seen other bloggers use washi tape as decoration on cards, wrapping paper and gift bags, but never thought it was my cup of tea.  Too random and unstructured, I thought.  Well, let me tell you, I have never felt so free!


Inspiration came during the week in the form of some decorated wrapping.  I had purchased a few bits and pieces on etsy, and some of the purchases arrived wrapped in brown paper and decorated in washi tape.  It was a complete revelation that the random placement of torn washi tape could create such an effortless look.  It is this breeziness that appeals to me, the less is more quality that seems thrown together at the last minute but isn't. While there are no rules, you still need to make some strategic decisions about placement and colour to achieve a balanced look.  

With that in mind, here are the results of my first foray into the world of washi tape.


I started small......


....added some lace flourishes....


... grew in confidence....


and then went completely too far....


Less is definitely more, but it was fun going there.

These little rice paper rolls of colour add the 'sweetness and functionality' to a gift bag that the manufacturer (mt masking tape) is looking for.  I'll definitely be using it again.

Sunday, July 1, 2012

Gift Wrapping - Cascade of Hearts

T'is the birthday season so I have been wrapping up a storm in recent weeks. I bought a retro biscuit barrel for one of my friends which threw up a few wrapping challenges.  A large, cylindrical shaped gift is a difficult shape to wrap as the large surface area makes the wrapping paper look very flat and uninspiring.  I decided to add some structure and texture to give the wrapping a lift.  I started with a blank canvas of brown paper, added some sinamay and twine around the centre, and topped it off with some heart-shaped ornaments.


The main feature is the ornaments.  You'll need some coloured card (preferably coloured on both sides), craft glue, twine and scissors. Draw half a heart shape and cut it out.  Mine is about 5.5cm.   Use this as your template.


Fold the card in half and cut out six half-heart shapes on the fold so you get six complete hearts.


Take one heart, and glue half of another heart to half of the first heart.


Repeat until you have glued five half hearts on top of one another.  For the sixth heart, glue one side of a whole heart and stick it to half of the fifth heart and half of the first heart.  This creates the ornament shape.  Press all sides together firmly, and trim any uneven bits.

Take some twine and thread it through the centre of the ornament, and tie a knot and the bottom.


I made five ornaments using different lengths of twine.  I knotted all the twine together and stuck the knot to the top of the present.  


The end result is a cascade of hearts in 3D.