Sunday, August 28, 2011

Gift wrapping with flowers

When I am out shopping, I always have an eye out for things I could potentially use to decorate a gift.  I like to rummage around on sale tables looking for charms, ribbons and decorations and give them a second life.  The post Christmas and Easter sales are always good and I often pick up decorations that are not too Christmassy or Eastery that can be used throughout the year.  Craft shows are also good for little bits and pieces like charms that can be strung on a ribbon and tied around a gift, and paper decorations that can be stuck onto cards or wrapping paper.  As I go shopping more often than I go to gift-giving occasions, I have quite a collection.  Here is just a quick peek at the tip of the iceberg:


Gift wrapping is like any other creative process.  I like to think about the present, the person I'm giving it to, the colours the person likes, whether these colours are appropriate for the gift and the occasion, the balance of decoration relative to the size of the present, differences in texture and, importantly, the kind of mood I'm in.  I tend to use plain wrapping paper, usually glossy white or brown, rather than patterned paper, as it allows greater freedom when choosing the decorative elements.  I usually try out several combinations of ribbons and decoration before deciding on the final one.  Sometimes things comes together quickly, and sometimes they don't, and you just have to go with the flow.  When nothing is coming together, I go to Plan B, which involves a box or a bag with lots of cellophane or tissue paper.

This morning I wrapped a book on flower arranging for a friend's birthday.


As my friend likes pastel colours and the book includes lots of pictures of pastel-coloured arrangements,  I decided to wrap the present in soft colours.  And because the book is about flowers, there needed to be a flower somewhere.  Fortunately, I had a millinery flower in my collection I had bought at a post-Melbourne Cup sale at Spotlight a couple of years ago.

I started by inserting a glue-dipped stem into the base of the flower. 


I then covered the base of the flower with floral tape.


I wrapped the book in thick white glossy wrapping paper, and covered it again with a soft green, crepe-like paper.


I then wrapped the present with silver ribbon, by fixing one end to the underside and winding the ribbon around the present Egyptian mummy-style.


I then inserted the flower underneath the ribbon, et voila!


This is so easy to do with any kind of flower, and takes no time at all if you have the right gear to hand.  I think the result is simple and elegant. 

Sunday, August 14, 2011

Fail-safe Pavlova Recipe

Strawberries have started to appear in the shops, which means only one thing in Australia - its Pavlova season!


Pavlova is essentially a giant meringue, with a crusty outside and a marshmallowy inside, and is always decorated with whipped cream and fruit.  Strawberries are a very popular choice, but a tropical topping with kiwi fruit, mango or peaches, and passionfruit is also very popular.  I'm a straight down the line strawberry girl for the everyday pavlova, but on a special occasion, like Christmas, I augment with blueberries and raspberries and drizzle with passionfruit curd.


The origin of the pavlova has been the subject of considerable debate between Australians and New Zealanders, with each claiming the original recipe.  I'm not going to get into that here, except to say that it is a very popular dessert in both countries.  Everyone does agree that the dessert was named after the Russian ballerina, Anna Pavlova.  I used to have a Russian Blue cat called Pavlova, but that is a whole other story. 

Pavlova is quick and easy to make, and especially satisfies the sweet tooth in any family.  You can also make the recipe gluten-free by using a gluten-free cornflour. 

Here is my fail-safe pavlova recipe.

Pavlova

4 egg whites
a pinch of salt
225g caster sugar
1 tsp cornflour
1 tsp vanilla essence
1 tsp white wine vinegar
600ml thickened cream
fruit to decorate

Preheat the oven to 140 degrees celsius.

Line a baking sheet with baking paper.  Whisk the egg whites with a pinch of salt until stiff, then gradually add the sugar one dessertspoon at a time until thick and glossy.  To test if all the sugar has been dissolved, dab an index finger in the mixture and rub against your thumb.  If you can still feel grains of sugar, you need to keep whisking. 


Add the cornflour, vanilla essence and white wine vinegar into the mixture and mix until dissolved.  By the way, I have tried using vanilla extract, but the meringue ends up looking a little too brown.  What you are trying to achieve is a glossy, snowy finish. 
Spoon the mixture onto the lined baking tray and then shape into a circle, smoothing the sides as you go.


I prefer to create a high meringue, as it looks nicer when you cut the pavlova into slices, but this means there is less room to decorate the top.  If you like a lot of fruit, then create a flatter disc. 


Bake the meringue in the oven for about an hour.  Let the meringue cool on the tray.  The middle will crack and sink a little bit, but don't be alarmed as you can fill this up with cream.


When cool, carefully peel off the baking paper and place on a large serving plate.  Decorate with an enormous amount of whipped cream, and your fruit of choice.  Keep in the fridge until ready to serve.

Sunday, August 7, 2011

Chocolate Self-Saucing Pudding Recipe

I live in a city where it doesn't rain much.  When it does rain, people look up and think 'what is this wet stuff falling from the sky?' and then immediately forget how to drive.  Perth has had an unusual amount of rain this year in the sense that we've almost met average monthly averages.  As it is still wet and cold here, there is still room on the dinner menu for a comforting, wintery dessert. This is another gem from the family archive, which came to us via a neighbour after my mother had a car accident.  Mum was on her way to pick me up from primary school, and another car drove through a stop sign and into the side of her car.  Fortunately, no broken bones but she was badly bruised and shaken.  Our neighbour came over that evening with four servings of chocolate self-saucing pudding with whipped cream.  It was such a thoughtful gesture.  I took the bowls back the next day and copied down the recipe, and here it is in my 11 year old hand-writing (complete with spelling mistakes):


The measurements in the original recipe are in imperial, so I have converted them to metric, and made a few other tweaks.


Chocolate Self-Saucing Pudding

60g unsalted butter
1/2 cup caster sugar
1 egg
1 tsp vanilla extract
1 cup self raising flour
2 level dessertspoons of cocoa powder
1/2 cup milk

Sauce
1/2 cup caster sugar mixed with 2 level dessertspoons of sifted cocoa powder
1 and 1/2 cups of hot water

Pre-heat oven to 180 degrees celsius.  Cream the butter and sugar well, then add the unbeaten egg and vanilla extract and beat until well combined.  Sift the flour and cocoa powder together and add this to the mixture alternatively with the milk.  Mix until smooth.  Pour the mixture into a greased ovenproof dish, and sprinkle over the sugar-cocoa mixture.  Don't worry about whether there are any lumps of caster sugar as these will dissolve when the hot water is added.


Gently pour over the hot water.


 Bake in the oven for 35-40 minutes.


This is great on a cold winter's night served with whipped cream, but is even better eaten cold the next day. Take my word for it, there's nothing tastier than a bit of congealed chocolate sauce.

Tuesday, August 2, 2011

Fabric Cards

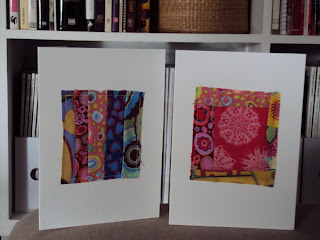
Like most people who dabble in the dark art of quilting, I have a lot of fabric.  I refer affectionately to my pile of fabric as a “vesuvius”.  Its big.  It consists of fabric that I’ve bought, put away neatly in boxes and never looked at again, fabric that I’ve washed and ironed diligently with a view to making a quilt but remains where I left it, fat quarters that I’ve bought at quilt shows, and backing fabric that I’ve bought on special at Spotlight.  I’ve also got fabric for sewing and quilting projects that are in various stages of completion.  And then there’s my collection of fabric scraps, which I know will come in handy some day.  Today is that day.  I was foraging amongst my bag o’scraps with a view to doing a bit of a stocktake.  Most of the scraps are unusable for quilting projects as they are too small and irregular, but it dawned on me that I could use them in a card-making project.  Here are two of the cards I made:

To make the card on the right, you need four strips of fabric of similar width but each slightly larger than one another in length, and a rectangular piece.  Choose colours that are complementary and will really pop against a white background.  Sew a strip which is about the same size as the length of rectangle to one side of the rectangle.  Iron the seam, and press to the centre.  Sew another strip which is equal to the combined length of the strip and the rectangle.  Again, iron the seam and press to the centre.  Sew another strip to the right hand side of the rectangle, and then sew the fourth strip, which is the combined length of the rectangle and two side strips, along the bottom of the rectangle.  Trim off any excess material, if required.
Place the fabric square on a card.  I used 10.5cm x 14.7cm cards.  Using a sewing machine, sew around the outside of the card, stopping just short of each corner of the fabric. 

As you can see, the stitching is visible on the inside of the card. 

You can leave this if you like a more artisan look, otherwise, you can hide it by cutting a piece of matching card or white paper equal in size to the stitched area and gluing it to the inside of the card.
For those of you who are more symmetrical, take five strips of fabric of equalish length and width. 

Sew each strip together, ironing each seam as you go and pressing towards the centre.  It is important that all the seams go in the same direction so that the finished piece is as flat as possible.  Trim any excess fabric so that the end result is a nice, neat rectangle.  Place the fabric on the card and, as before, sew it to the card around the edges. 
If you’re feeling game, you could try a circle of fabric.  Choose a circle size that is proportionate to the size of the card.  I used the bottom of a coffee cup. 

Using five different coloured strips of similar width and length, sew each strip together, pressing the seams as you go.  Trace the circle on the reverse side of the fabric and then trim the fabric to match the circle.

As with the other cards, sew the circle to the card.  However, you need to do this very slowly and move the card around carefully as you sew, otherwise you will find yourself on the very edge of the circle with nowhere else for the needle to go.
If anyone has any great ideas on how to use fabric scraps, please leave a comment.