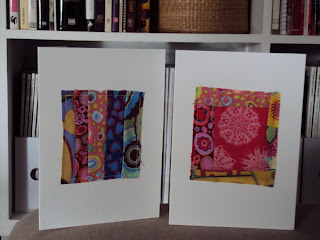
Like most people who dabble in the dark art of quilting, I have a lot of fabric. I refer affectionately to my pile of fabric as a “vesuvius”. Its big. It consists of fabric that I’ve bought, put away neatly in boxes and never looked at again, fabric that I’ve washed and ironed diligently with a view to making a quilt but remains where I left it, fat quarters that I’ve bought at quilt shows, and backing fabric that I’ve bought on special at Spotlight. I’ve also got fabric for sewing and quilting projects that are in various stages of completion. And then there’s my collection of fabric scraps, which I know will come in handy some day. Today is that day. I was foraging amongst my bag o’scraps with a view to doing a bit of a stocktake. Most of the scraps are unusable for quilting projects as they are too small and irregular, but it dawned on me that I could use them in a card-making project. Here are two of the cards I made:
To make the card on the right, you need four strips of fabric of similar width but each slightly larger than one another in length, and a rectangular piece. Choose colours that are complementary and will really pop against a white background. Sew a strip which is about the same size as the length of rectangle to one side of the rectangle. Iron the seam, and press to the centre. Sew another strip which is equal to the combined length of the strip and the rectangle. Again, iron the seam and press to the centre. Sew another strip to the right hand side of the rectangle, and then sew the fourth strip, which is the combined length of the rectangle and two side strips, along the bottom of the rectangle. Trim off any excess material, if required.

Place the fabric square on a card. I used 10.5cm x 14.7cm cards. Using a sewing machine, sew around the outside of the card, stopping just short of each corner of the fabric.
As you can see, the stitching is visible on the inside of the card.
You can leave this if you like a more artisan look, otherwise, you can hide it by cutting a piece of matching card or white paper equal in size to the stitched area and gluing it to the inside of the card.
For those of you who are more symmetrical, take five strips of fabric of equalish length and width.
Sew each strip together, ironing each seam as you go and pressing towards the centre. It is important that all the seams go in the same direction so that the finished piece is as flat as possible. Trim any excess fabric so that the end result is a nice, neat rectangle. Place the fabric on the card and, as before, sew it to the card around the edges.
If you’re feeling game, you could try a circle of fabric. Choose a circle size that is proportionate to the size of the card. I used the bottom of a coffee cup.

Using five different coloured strips of similar width and length, sew each strip together, pressing the seams as you go. Trace the circle on the reverse side of the fabric and then trim the fabric to match the circle.
As with the other cards, sew the circle to the card. However, you need to do this very slowly and move the card around carefully as you sew, otherwise you will find yourself on the very edge of the circle with nowhere else for the needle to go.
If anyone has any great ideas on how to use fabric scraps, please leave a comment.


No comments:
Post a Comment