Showing posts with label Gift wrapping - doilies. Show all posts

Monday, January 28, 2013

The Ancient Art of Tea Dyeing

Every morning before I wash my tea cup out at work, I look at the tea stains on the bottom and sides and wonder what the numerous cups of tea I have during the day are doing to my internal organs.  Dying them a nice shade of light brown, I suspect.  I'm not too worried though as I come from a long line of tea drinkers who all lived to ripe old ages.  And they liked cups of tea with a side of cholesterol so my future looks OK.


This week I decided to combine my love for tea with my love of doilies through the ancient art of tea dyeing. I experimented with ivory and white paper doilies, and also threw in some paper gift tags to see what would happen.

Tea dyeing involves tea bags, water and copious amounts of paper towels.  You take some tea bags and place them in a large container.  I used six teabags in a non-stick roasting pan.  I filled it with about one litre of boiling water.  In one batch, I stewed the teabags for about 5 minutes and took them out before putting the doilies in.  In the other batch, I left the teabags in.  Don't be afraid to layer the doilies in the pan - I put in 15.  Also tap the doilies lightly to remove any air bubbles caught underneath otherwise you will end up with tiny white circles on the finished product.


Leave the doilies to soak for 2-3 hours, and then carefully remove them with tongs.  I say carefully as the edges of the doilies are quite delicate and can tear.  Put the wet doilies on paper towel to dry.  In a Perth summer the doilies take about an hour to dry.  However, the gift tags need to dry overnight.

Now to the end result.  The batch with the teabags left in were darker and patchy in colour.  On some, the edge marks of the tea bags were visible, which adds an interesting effect, especially on the gift tags.  The batch without the teabags left in were lighter and more evenly coloured so if you are a perfectionist, this is the method for you.  Also, the darker the original product, the darker the result so the ivory doilies and the manila gift tags were significantly darker than their white counterparts.


Once dry, iron the doilies and gift tags on a high setting.  The gift tags refused to play nicely and were still curling up at the edges so I put them under some heavy books overnight to flatten out.  


Tea dyeing gives a nice vintage effect, and doilies dyed in this way complement vintagey styles of gift wrap.  I really like the doily flowers (a how to is covered in my 25 November 2012 post) as they add height and texture.


Sunday, November 25, 2012

Paper butterflies #3 with Doilies

I hate it when work gets in the way of the rest of my life.  However, after a short hiatus, I'm back and just in time for Christmas too.  But before I start focusing on Christmas, I have one last paper butterfly hurrah for 2012...but this time with doilies!


I had two gifts to wrap.  I started with some beautiful green patterned tissue paper, which I covered with thick clear cellophane.  I decorated each gift with an ivory ribbon tied in a simple bow.  The ribbon has a thin grey stripe on the edges which added a nice contrast to the green. Using my trusty butterfly punch, I punched out two butterflies from green card, which I then glued to each bow.


As there were two gifts, I needed a carry bag, and this is where the doilies came in.  I glued a large white paper doilie to the centre of the bag, and added a doilie flower.  Making doilie flowers is my new favourite thing to do and I now have a pile of them on my kitchen table.  To make the flower, I used five small white paper doilies.  I inserted a paper fastener in the middle and then folded, scrunched and twisted each doilie until it resembled a flower.


I glued the flower onto the doilie in the centre and then glued on two green butterflies in as au natural pose as possible.


The result is very feminine, but not too over the top.


Sunday, October 9, 2011

Gift wrapping with doilies

I knew this would have to come out sooner or later.  I like doilies. There, I've said it.  Here are some I have collected from Op shops over the years:


Doilies have been around for a long time, and apparently date back to the 11th century.  They reached their zenith in the 19th century and no Victorian drawing room was complete without a collection of dust- gathering doilies.  However, let's face it, doilies are no longer a popular decorating choice, except with some nannas. 

I like doilies because of their link the past, in particular, the role that needlework played in the creative lives of women.  It took a certain kind of woman who, after spending hours putting clothes through a mangle, wanted to sit down and crochet intricate patterns with cotton thread in failing light.  Sure, some of those women didn't have to work and, in between husband-hunting activities, could focus entirely on sewing a fine seam.  However, I like that, for a period in history, needlework was a skill that many women from all walks of life shared. 

All of the doilies I have collected have been made by machines.  But this does not detract from their beautiful patterns and textures. 


It also means that I don't feel guilty when I re-purpose them for gift-wrapping and card making activities. 

Using craft glue that is suitable for fabric, you can stick doilies onto just about anything.  Here are some ideas for bags and boxes:


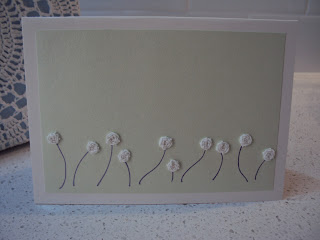
For these cards, I cut out flowers from a table runner and glued them on:


You can even use a doilie to give a old t-shirt some interest:


Next time you are in an Op shop, I'd encourage you to go down to that dusty corner and find the old shoebox with the neglected doilies and hankies. After a soak and a wash, they can be given a new lease of life.